Skip navigation

In the last post, I went into a brief history of “Let’s Play” videos and why I find them enjoyable.  In this post, I’ll go into how I create them, step by step.

Step 1:  Choosing a Video Game

First, Dragon Maiden and I choose a video game that we would like play and make entertaining commentary about.  So far we have a list of games that we want to eventually make Let’s Plays about.  For our first couple of games, we’re going to be playing Super Mario All Stars which is a collection of the Super Mario Bros games.  We’re starting out with this game because we’re both familiar with it, its fun to play, and there’s stuff to discuss about it.  Plus by time we’re done with the game, we would have ironed out the kinks of creating Let’s Play videos and be comfortable enough to branch out into other games.

Step 2: Setting up a screen recording program

A screen recording program is a program that records video footage of whatever is currently on your computer screen.  Having one is essential because we’ll be playing the video game on the computer.  Currently, I use a program called “BB Flashback Recorder”.  The free version has all the base features I need to reliably record video footage.

BB FlashBack Express Recorder

The welcome screen for BB FlashBack Express Recorder

Step 3: Downloading the video game ROM and console emulator

In order to play certain video games on the computer,  you’ll need a program called an emulator.  An emulator is a computer program that emulates, or mimics, a video game console, like the NES, SNES, Sega Genesis, Sony Playstation, etc.  Once you have the emulator for the console of your choice, then you need to download the ROM of the video game you want.  A ROM is a file that contains the code of the video game, that the emulator program can read and play.

Step 4: Play the video game on the emulator, while recording yourself with the screen recorder.

I set up the emulator, start the video game, and then play it until the point where I want to start recording.  From there I pause the game, and use the screen recorder to start recording the emulator.  Then I unpause the game and continue playing until I’m done recording.  When I’m done recording, I stop the screen recorder and save the footage.

Emulator and Screen Recorder

Using BB FlashBack Recorder (the tiny icons in the upper right hand corner) to record playing a video game off of ZSNES, a Super Nintendo Emulator

Step 5: Record the audio commentary

Once I have the footage saved, I replay the footage in a regular media player, like Windows Media Player.  But while I’m replaying the footage, Dragon Maiden and I are also talking into a microphone and recording my voice over commentary.  I use another computer program, named “Audacity”, to record this audio.  Audacity is an audio recorder and editor, that lots of musicians, podcasters, and audiophiles use to edit their music/audio files.  Its pretty powerful, but I use it for the simple purpose of recording my commentary.  Once we’re done talking, I save the audio as an mp3 file.

Audacity

The main screen of Audacity, the audio recorder/editor I use

Step 6: Putting the video and audio commentary together into one file

After the commentary is done, I use Windows Movie Maker to combine the video and audio into one playable file.  Windows Movie Maker is a simple video editor, that comes bundled in most Windows Operating Systems.  It works perfectly for what I need it for now, which is trimming the video file so all the useless footage is cut out, and adding the commentary audio track to the video footage.  But down the road, I want to upgrade to a more powerful video editor like Sony Vegas or Adobe Premiere.  But for now, Movie Maker is good enough.

Windows Movie Maker

The main screen for Windows Movie Maker

Step 7: Uploading the combined file onto YouTube, so that others can watch and enjoy it.

Once I’m done using Movie Maker, that’s it….I finished the editing the Let’s Play video.  I save the video into a file type that YouTube will accept, such as a WMV file.  Afterwards, I upload the file onto YouTube, which takes FOREVER to do (one 15 minute file takes around 30 minutes).  Once YouTube accepts the file, I’m done with the whole process.  Now people can watch Frozen Diamond Dragon and the Chimeric Muse playing video games 🙂

YouTube File Upload

A screenshot of YouTube uploading a file

So that’s how I create a Let’s Play video.  Check out our YouTube channel here and I hope you enjoy our videos.

A few years ago, a guy on the SomethingAwful.com internet forums, named Slowbeef, came up with a bold yet simple idea.  To record video footage of himself playing video games, along with live audio commentary.  The idea of commentating video game playthroughs wasn’t new.  Beforehand, Something Awful was hosting discussion threads where people typed out commentary over screenshots of the game.  The internet forum named these type of threads “Let’s Play” topics.  But the idea of live video commentary of playing video games WAS new, and the “Let’s Play” name carried over to mean video game commentary video.

Slowbeef’s “Let’s Play” video idea spread like WILDFIRE.  It dominated Something Awful and it soon spread off that site like a virus.  Different communities and websites hosting “Let’s Play” videos began spreading up over the years, with the most prolific being on YouTube.

I’m not sure if this is the true history of “Let’s Play” videos, since I wasn’t there when it happened, but it sounds good to me.  I started watching Let’s Play videos (LPs I’ll call them from now on) a few years ago, and they are some of the most entertaining videos I’ve ever seen.  When done right, it’s an exciting experience watching someone else play a video game.  You get excited at their triumphs in the game.  You laugh at their hilarious mistakes.  You learn more about the video game you’re watching.  Plus if the person you’re watching is especially funny and interesting, the experience is like watching one of your friends play video games.

After a few years of watching LPs, I began to think that maybe I can create a Let’s Play video too.  So with my new Asus computer, I started  creating LPs.  There by my side is my partner in crime, Dragon Maiden (if you remember her from the Oshawott Pic I did earlier in the blog), who’s an even bigger fan of LPs than I am.  She does the voice over commentary with me.

Together we make up the “Frozen Diamond Dragon and the Chimeric Muse” LP team on YouTube:

Frozen Diamond Dragon and the Chimeric Muse Play Video Games

We started back on May 27th, and we only played Super Mario Bros 1 and we’re currently playing the US version of Super Mario Bros 2.  I hope you enjoy our videos.

Next post, I’ll go into how I go about creating the LP videos and the creativity that goes into making them.

Right now I’m still in the process of brainstorming a script together.  I’ve been working on it everyday, as I  definitely feeling the clock ticking as July 22 slowly creeps up.  I’m about halfway done with it now.  I was having some difficulty with it because I had to find a new brainstorming style.

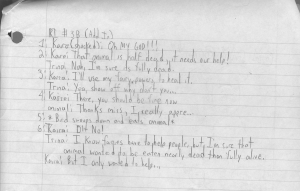
Back when I did the Niece Web series, I used to be able to script a comic as I went along.  I would brainstorm, and write down the character notes, panel notes and dialogue all in one sitting.  Here’s a sample of my old brainstorming style that I used when I worked on a comic 6 years ago.  The comic I’m about to show you was a comic I worked on before Niece Web, called Trailblazers.  It was about a strong boy named Zoan (not shown), a fairy named Kaira and a magical girl of destruction named Trina.  They went on random adventures together.

Trailblazers Notes

My notes on a Trailblazers comic

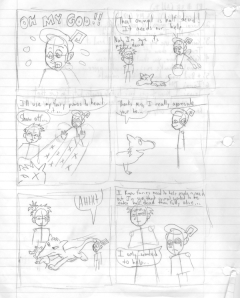
I would sit down a script the comic as I brainstormed the ideas behind it.  In my notes, I was only concerned about dialogue.  The numbers in the margin was the panel number, and I wrote enough dialogue that could naturally fit into the panel.  This was my idea of story writing back then.

Trailblazers Thumbnail

My thumbnail sketch of a Trailblazers Comic

After I finished the script, I would turn the page over and draw out a thumbnail sketch.  I took the dialogue and created the art around it.  When I did the thumbnail sketch, all I was concerned about was facial expressions, visual effects, camera angles and speech balloon placement.  Other stuff like body figures and background art, I figured out when I worked on the final artwork.

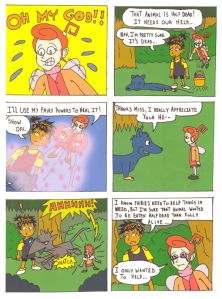
Trailblazers Comc

The finished Trailblazers comic

After the thumbnail sketch (it usually took one, and I was satisfied), I worked on the final artwork.  All the other visual details not addressed in the thumbnail sketch, I worked out along the way as I completed the final artwork.

Right now if I was to try to create a comic using my old brainstorming style, I would immediately run into writers block.  I think I figured out why.  Now when I brainstorm, I’m juggling a lot more topics in my head than just straight dialogue.  Topics such as characterization, visual details, plot, etc.  I find that I can’t start out with doing dialogue anymore.  I have to brainstorm other areas of the story first before I even begin to think about dialogue.

That’s where my current brainstorming style comes into play.  I sit down and write down everything that’s going through my mind about the story, in a stream of consciousness writing style.  For example, I need to figure out Spider’s motivation for doing a certain action….so I write down exactly that, and begin to write down every idea I have on that problem.  This brainstorming style has been very effective for me, and my ideas are flowing onto the page.  The only drawback to this brainstorming style is that it takes up more of my time to do.  Not only that, but now I have to script the comic separately from my notes, which…again…takes up time.  But its the best style I have going for me right now, and its getting results.

***This is a continuation of the lesson learned from the Drawing Course: Task 1 (Form) post***

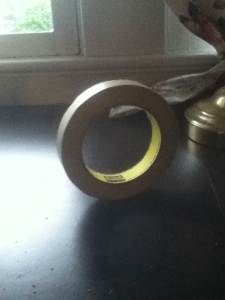
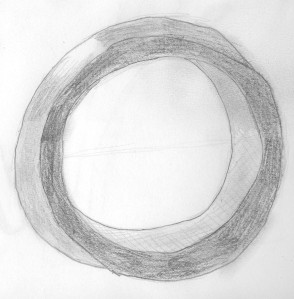
Task 2: Tone. Draw an object with a single light source, then move the light source to a new position and redraw.

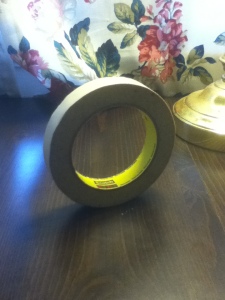
Masking Tape- Light Source 1

Masking Tape- Light Source 1

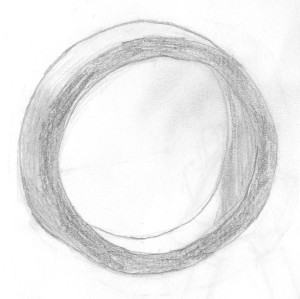
My sketch of Masking Tape- Light Source 1

My sketch of the above masking tape

Masking Tape- Light Source 2

Masking Tape- Light Source 2

My Sketch of the other masking tape

My Sketch of the other masking tape

How did I do?

Right off the back, I realized that the light sources didn’t create that much of a difference on the masking tape.  Instead of the shadows moving onto different areas of the masking tape, the shadows only got deeper.  I did switch the light sources (1st light source is a lamp on the right, and the second is the outside light coming from the left), but the subject itself doesn’t allow for too many differences in tone.  Maybe I should revisit this task?

I mentioned in past posts that I hate drawing circles.  So when doing these tasks I chose objects that help me to get out of my comfort zone.  So that’s what lead to me choosing masking tape for this task.  An object that requires you to draw a perfect circle.

This was another tough task for me to complete.  Personally I thought the masking tapes came out sucky.  You can see the wobbliness of the lines as I tried to draw the circles and was hesitating a lot.

The tone of the objects came out average, I suppose.  As I mentioned earlier, the shadows on the masking tape weren’t different enough to warrant a second sketch.  I effectively made the tones darker for the second sketch, which they were.

Yea, I anticipate me becoming neurotic as I go through this book and complete these tasks.  My inner critic is going to drive me insane, lol.

Its time to do a task from the “Complete Drawing Course” book!  The first section of the book deals with drawing objects, and the first chapter deals with observing objects so you can draw them.  Here’s what I learned from the chapter:

-Objects have 4 properties that are drawn: Form (their solid qualities), Texture (surface quality), Color and Shades of light and dark.

-The chapter stresses that when you’re drawing an object (or anything in reality), you’re not just copying the object onto the paper….you’re giving your interpretation of how you view the object.  Two people drawing the same object will have 2 differing drawings because of their own unique interpretations and views of the object.

The book gives 4 tasks that help to explore the properties of an object.  Here’s the first one:

Task 1: Form:

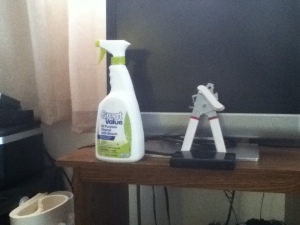
Draw 2 objects of completely different forms, side by side, on a table.

Here’s my task:

CDC Task 1 Objects

2 objects of different forms, side by side. A spray bottle of All Purpose Cleaner and a can opener

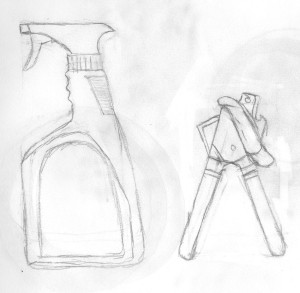
CDC Task 1 Sketch

My sketch of the 2 objects

This task was tough!  Let it be known that I HATE drawing still life.  But I’m going through these tasks anyway to hone my drawing skills.

The toughest part of the drawing was measuring proportions and angles.  Many times, I had to erase and redraw because a section of the object was disproportionate to the other sections, or the angle of some lines didn’t match.

Proportions and measurement are the themes I have to tackle if I want to become a better artist.

Doing this task did give my self-confidence a boost, despite my inner critic assassinating me.  I liked how the book said that drawings are interpretations of how you perceive reality as an artist.  No matter how bad I “think” I draw, my drawing is still good because that’s how I interpreted the subject.  You can’t take that from me, its my own unique view.  Of course with practice, my interpretations will become more realistic, but for now they’re fine as they are.  Let’s just say they’re the interpretations of the Chimeric Muse on May 31st, 2011.  Who knows how the future Chimeric Muse will interpret these same objects.

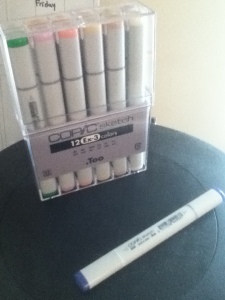
Awhile ago, I purchased a set of Copic Markers:

Set of Copic Markers

My set of Copic Markers

Made in Japan, Copic brand markers have long been in use by the artists there.  They come in approximately 346 colors, released in various sets and themes.  The markers aren’t just prized strictly in Japan, as they are sold internationally and sought by artists everywhere (and not just artists influenced by Japanese art either).

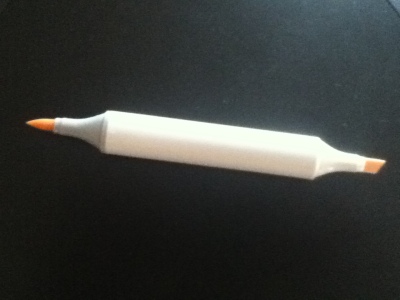
Copic Marker

A Copic Marker

Each Copic marker uses a special casing that’s durable.  When regular markers run out of ink, they shrivel up and die a horrible death.  But with Copic Markers, you can easily refill the marker with ink, so you won’t have to buy a new marker each time.  Another advantage to having refillable inks is that the inks themselves can be mixed into brand new colors before being inserted into the markers.  Too, the company that manufactures Copic Markers, makes special “blank” markers for this very purpose, adding to the versatility of the marker brand.

Each marker is also double-sided, with one end having a brush tip and the other having a typical angled nib.  These tips are the main claim to fame about these markers.  Using the brush tip especially feels loose and natural, and you’re able to use a wide variety of coloring techniques with them.  The angled nib has its purposes too, if you desire a straight, consistent line.

Dragon Maiden, the person I drew the “Power of Oshawott” pic for, has been a fan of Copic Markers for a few years and has been trying to get me to buy a set for a while.  But they’re so expensive, with a set of 12 costing well over $100, and a set of 72 (its highest) costing over $300.  Finally, I stopped being cheap and decided to buy a set of 12 (I got them at a discounted price though anyway).

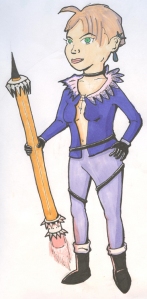
I wanted to try them out, so I drew a random picture for me to color.  Now I’ll introduce Kateri, Guardian of the Pencil Lance:

Kateri, Guardian of the Pencil Lance

Kateri, Guardian of the Pencil Lance

When I said random, I meant random.  My muse had a field day combining random design elements into one whole.  What it came up with was a rocker-ish looking girl holding a lance designed after a #2 pencil.  She was named Kateri because Dragon Maiden thought she looked Native American, and I looked up a random Native American name for the character.

After penciling and inking Kateri, it was now time for the main event.  The whole reason the pic existed…to test the Copic Markers.  And the markers definitely lived up to its reputation.  Kateri was mostly colored with the brush tip, and I found myself thinking I was painting with oil paint rather than coloring with a marker.  That’s how natural and intuitive the brush tip felt.

The artwork made the best of the 12 colors I bought.  Unfortunately, the set of 12 markers I bought was themed after skin tones, so the colors leaned toward the yellow/purple side of the spectrum.  I say its unfortunate because I really wanted a set of basic colors, where I could really play around and create colorful artwork, but the store I went to didn’t have it.  So Kateri was forced to have a purple/orange theme, which still worked out pretty good anyway.

I did some minor color mixing with this artwork, as you can see with the shading and in the hair section.  With Copic Markers, and regular markers too, the more you color a single section, the darker the color will come out.  So I used that property to create shading, by coloring the shaded regions twice with the same color.  The hair section combined 3 colors, an orange, a blue and a tiny bit of a green.  The only problem I had really was with highlighting.  I attempted some highlighting on Kateri’s leg on the left hand side, but it came out looking kind of dull, and not bright looking.  That’s because, again, when you mix 2 colors, the result color is darker.  So next time I use copic markers, I’ll have to plan ahead and use other techniques if I want better highlighting.

I hope you enjoy this experimental artwork, and the brief look at Copic Markers.  Down the road, I’ll go more in-depth about Copic Markers as I learn more about them (there are tons more info about different marker types, techniques, history, famous people who use them, etc).  But that’s enough for now.  Laters

With less than 2 months before my birthday, I had to get started with working on the Niece Web story I vowed to do.  There’s no way I can get away with doing this last-minute, even if I wanted to.  I need at least a full month and a prayer to just get the final artwork done.  So the first month will be all planning and preparation, and I want to get that done as soon as possible so I can get started with the time-consuming artwork.

My first plan of action is coming up with the plot of the story. So I’m sitting at my computer working on the story. You would think that it would be easy for me since I’m rewriting a story I previously did.  But NOPE, my muse wants me to do a mostly new story that’s based off the old one.  You see, I’ve spent the past few years researching on writing fundamentals, and what it takes to write a story.  This is the first story I’m writing since I finished that research, so my muse is itching to put its knowledge to use.  This reminds me of a person I know who’s enlisted in the army and had to do a tour of duty in Iraq.  I asked him if he was scared or nervous to be going to such a hostile territory for a few months.  His response gave me something to think about.  Was he nervous?  Yea, he was.  But he was also excited too.  Excited because he spent months in combat training learning skills, and he’s FINALLY going to put them to practical use.  I feel the same way too (though writing is MUCH safer than serving in active duty, thank you lord).

So I begin to work on the story.  I have vague, disjointed ideas floating around in my head.  “Spring, Autumn and Uncle Spider should start the story off playing soccer”, “Winter cooks a fabulous dinner”, “Melony is a psychiatrist and Neoma is a social worker”.  The ideas are ok, but they’re mostly details, and I’m looking for ideas that lead to a plot.  And here’s where the frustration sets in.  My muse wants to focus on details of the story, while I want to work on grander ideas that lead to a plot. My muse is stubborn and we’re having an internal battle now with each other, and my muse says “screw me” and shuts down all idea generation.

So now I’m sitting there with a nasty case of writer’s block.  Not only that, but the negative thoughts start to sink in.  “My writing sucks”, “Since coming up with a story is SO HARD, maybe I’m not cut out to be a writer”, “Why bother with this kind of frustration, just don’t bother with it”.  Not only am I frustrated with the writer’s block, but now I’m having an internal battle with even continuing writing period.  It was a tough time.  I’m trying my best to tune out the negative thinking, but it’s so hard because it’s not all just mental.  I suffer from clinical depression, so any negativity manifests itself into physical symptoms like headaches, lethargy, and my brain slowing down.  Ugh.

So how did I work through this.  For one thing, I remember something I posted about earlier on in this blog.  A post called “Blank Page Syndrome”, where just writing random gibberish will help get the creative juices flowing.  So I tried this method.  Because of my depressed brain, it was so hard to even write period, even random gibberish, but I pushed through the layer of mental heaviness.  I started by writing down the detail ideas that my muse came up with, and then I wrote down my desire to come up with ideas for the plot too.  Then something just clicked in my head, and I started coming up with ideas that I can create a plot out of.  “While Spring, Autumn and Spider are playing Soccer, Spider would meet Melony there, the lady he would have a disastrous date with”.  “Summer believes in romance, so she sees an incentive to plan Spider the perfect date, and have it go well”.  “Spring is forced to attend this date against her will, so she decides to play pranks for her own amusement”.

I won’t be spoiling the story I’ll eventually come up with, but that’s just some of the ideas I came up with so far.  I just wanted to detail the hellish battle I had with myself to get to this point.  But I’m committed to completing this vow.  Check back for more updates.

One of the reasons why I created this blog was to give myself motivation with producing more art.  I already got the ball rolling with making my birthday vow, but I also have another idea too.

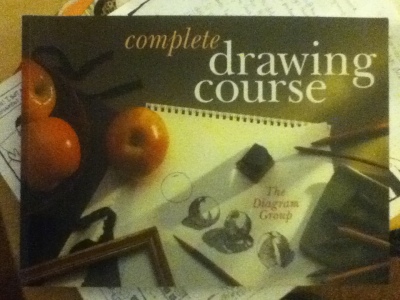
A few months ago I purchased a book called “Complete Drawing Course” by the Diagram Group.

Complete Drawing Course Book

Pretty much my textbook for now. The "Complete Drawing Course" Book

The name says it all.  The book gives lessons on various drawing topics, and then has you do tasks that lets you practice what you learned.  I bought the book with the hopes of completing the tasks, and now that I have my blog, I will complete the tasks and upload my artwork online.  That way, the blog will motivate me to complete the tasks….all 300+ of them, lol.

You may be asking “why bother with going through the book?”.  Well, going through this book will help me to  reinforce my knowledge of the basic fundamentals of drawing.  Its my belief that to be a good artist, you need to have a firm grasp of the fundamentals of your craft.  The basics of your craft have to become like second nature to you.  Once that happens, then you can experiment with your craft and become really creative, while doing so in an intelligent/clever manner because of your knowledge of your craft.

Without a grasp of the fundamentals, not only are you more prone to make mistakes, but your art might look “off” because its missing that certain “something”.  Your art might end up great, but it has a high chance of not reaching its potential.  That’s what I believe anyway.

So in the future, I’ll be posting the lessons that I’ve learned from the book, along with the tasks that I completed.  I’m looking forward to this, as I want to improve my drawing skills.  Should be fun

My Niece Web birthday vow was to rewrite and redraw a previous Niece Web story.  So now its about time I chose that story that I’ll be rewriting.

Niece Web had 5 stories: Disastrous Date, The More You Know Through Fear, The Chatterbox Technique, The Rainy Day Club, and a series of comics that I’ll nickname “The Egg Bet Story”.  I’ll go through each one, tell you a little about it, and any possible reasons why I’d want to revisit the story.

If you’d like to read the comics for yourself, please visit the Niece Web Gallery on DeviantART: Link.  The relevant comics have the story name in the title.

Disastrous Date

This was the story that kicked off Niece Web, and introduced Spider and the Nieces.  The story’s about Spider having a dinner date with his friends Neoma and Melony.  Melony had recently got reacquainted with Spider and she tries to use this dinner to hook up with him.  But unfortunately for her, Neoma also has feelings for Spider, gets jealous of Melony’s advances toward him, and tries to stop her.  The nieces are at the  dinner too and they stir up trouble for their own amusement.  Spider’s just along for the ride through the drama.

Out of all the stories I did for Niece Web, this one seems like the most fun to rewrite.  There are opportunities to have each of the main characters shine.  There are lots of opportunities for some lol moments.  Plus it’ll be fun to redraw this storyline using my 2011 art skills, and compare it to my 2005 artwork.

The More You Know Through Fear

This was the Halloween storyline.  The Nieces are waiting to attend a costume party.  While they’re waiting, Autumn suggests they play “The Game of Fear”, where you try to guess what the other person is afraid of.  Through this game, the Nieces reveal their deepest fears.  Some funny and some sad.

I could see a possible rewrite with this one.  I could elaborate further with this story.  Like I could keep the stuff dealing with the game of fear, but include some stuff of them actually attending the Halloween party.  Or I could even have the “Game of Fear” take place AT the Halloween party, with other people participating too.  The only downside is that Dark Spider doesn’t heavily feature into this storyline, and I definitely want to write a story with him having a prominent role.  I’d have to work quite a bit to include him into the story.

The Chatterbox Technique

I’m crazy for coming up with this story.  Dark Spider goes on a date with Neoma, and leaves his nieces in the care of Marty.  Marty is a big misogynistic asshole though, so Spider’s other friend Veronica comes to babysit Marty.  Marty treats the nieces like slaves, and they resent him for it.  Seeing this resentment, Veronica teaches the nieces the chatterbox technique, which has the power to turn men into sex crazed lunatics.  Armed with this technique, the nieces make Marty their slave as revenge and shenanigans ensues.

I really don’t want to deal with this storyline again, to be honest.  I’m not a big fan of it.  I made the Marty character too much of a creepy asshole, and he rubs me the wrong way.  The idea of the nieces being taught such a sexual technique rubs me the wrong way too.  Gives me pedophile undertones.  I hate to say all of this about my own storyline, as this was all done for gags and laughs, but it is what it is.

The Rainy Day Club

The LOOONNNGEST of the 5 storylines.  Dark Spider goes to the DMV on monsoon of a day, and the nieces are stuck inside the house.  To pass the time, they each write down an activity, and randomly pick which activity to do.  They start off playing a trivia game, but the whole day soon derails into a dramafest, as the nieces hurt each others feelings and get various acts of revenge on each other.  But through the drama, they get a chance to learn more about themselves and each other.

I consider this storyline the most epic and complete out of the 5 stories, and I can’t really imagine tweaking it in any kind of way.  It’s my favorite storyline.

The Egg Bet

(The first 8 comics, on the first page, in the Niece Web gallery at DA.  It starts with “Prelude to the Egg Bet” and ends with “Shut Up About the Toilet Egg”)

The storyline that ended Niece Web.  Spring bets Winter and Summer that she can convince Autumn that she laid an egg.  Summer thinks this is ridiculous and bets against Spring.  But unfortunately, Spring does convince Autumn that she laid an egg, through a clever prank.

As it stands, the story is complete.  But in reality its incomplete, because I abruptly ended Niece Web before it reached its conclusion.  The last comic just so happens to avoid being a cliffhanger and concludes the story in a way I didn’t intend it to.  This storyline has the most incentive for me to rewrite it, since its incomplete as I originally intended it.

The Final Verdict

It’s a toss-up between Disastrous Date, The More You know Through Fear and The Egg Bet.  I have decided to rewrite the Disastrous Date storyline because like I mentioned before, it seems like the most fun for me to rewrite.  Also it incorporates all the main characters and has the most opportunities for them to shineI will throw a bone to the Egg Bet and draw some strips that gives it a proper conclusion.  But that’s for later.
Since the story’s chosen, now its time to rework its plot.  But that’s for another post.  Laters.
Now that I finished the Oshawott Project, I can start work on fulfilling the Niece Web Birthday Vow, I made a few weeks ago.  As a reminder, I vowed to write, draw and color a completed Niece Web story by my birthday this year (July 22).

Link: Niece Web and My Birthday Vow

But since the vast majority of you all have probably never seen Niece Web, I figured it’ll be a good idea to upload the complete series again online.  To do this, I reactivated my old account at DeviantART.com and showcase them there.  DeviantART is a great website where artists can upload their art and have others view them and comment on them.  I plan on going more in-depth about DeviantART later on, but for now here are the links to my old DeviantART page and the link to the Niece Web section of it.  Enjoy:

My DeviantART profile: darkspiderzero.deviantart.com

Link: Niece Web on DeviantART

The comics are organized in reverse chronological order, so go to the last page of the gallery to find the first comic.  All of the comics feature descriptions that tell you when it was originally published and the medium I created the comic on.  Also most of the comics features tidbits of information and stories related to the comic, so make sure to not miss the description section of each comic.